Simple Methi Paratha Recipe with Wheat Flour, Besan, and Curd
There is something deeply comforting about the aroma of fresh fenugreek leaves hitting a hot tawa. Whether you call it a simple methi paratha recipe or a traditional methi saag paratha, this golden-brown flatbread is a staple in Indian households for a reason. It’s healthy, earthy, and stays fresh for hours – making it the perfect methi paratha recipe for tiffin or for travelling.
If you’ve ever wondered how to make soft methi paratha that doesn’t turn chewy or dry, the secret lies in the dough. By learning how to cook methi leaves properly and balancing the moisture, you can achieve that elusive restaurant-style finish right in your own kitchen.
What Makes This Recipe Special?
Most people know how to make methi paratha, but to get that authentic North Indian style taste, we use a specific blend of ingredients.
This is how to make methi paratha recipe with wheat flour, besan, and curd:
- Wheat Flour (Atta): Provides the structure and fibre.
- Besan (Gram Flour): Adds a nutty aroma and a slight “khasta” (crispy yet soft) texture.
- Curd (Yoghurt): The “magic” ingredient that ensures your parathas stay soft even after they cool down.
Quick Tips for Success
- Prep the Greens: Always wash methi leaves thoroughly and chop them very finely. Thick stems can tear the paratha while rolling.
- Don’t Skimp on Fats: Adding oil or ghee to the dough prevents the parathas from turning chewy, making them perfect for tiffins and travel.
- The Tawa Temp: Cook on medium-high heat. Cooking on low heat for too long evaporates the moisture, leaving you with a hard paratha.
Why You’ll Love It
Whether you are looking for a quick breakfast or a reliable meal for a long train journey, this simple methi paratha recipe is your best friend. It pairs perfectly with a dollop of white butter, a side of tangy pickle, or a bowl of fresh yoghurt.
Pro Tip: If you’re making this for travel, wrap the parathas in foil while they are still slightly warm (but not steaming) to retain their moisture for up to 24 hours.
Watch how to make methi paratha:
Stay Inspired! If you enjoyed this recipe, please subscribe to my YouTube channel. Don’t forget to click the bell icon so you’re the first to know when a fresh new video drops! 🔔
Hungry for More?
If you loved this Methi Paratha Recipe, you have to try these fan favourites next!
Yields: 6 parathas | Prep time: 25 mins | Cook time: 15 mins
Ingredients
For the Leaf Prep:
- 75–80g Fresh methi (fenugreek) leaves
- 1 tsp Salt (for soaking)
- Water, as needed
For the Dough:
- Salt, to taste
- 1 tsp Ajwain (carom seeds)
- 1 tsp Red chilli powder
- ½ tsp Turmeric powder
- 2 tsp Kasuri methi (for extra aroma)
- 2 tbsp Besan (gram flour)
- 1.5 cups Atta (whole wheat flour)
- 2 tbsp Oil (for the dough)
- 1 tbsp Ginger-garlic-green chili paste
- 2 tbsp Curd (yoghurt)
- Water, as required for kneading
- Oil, for pan-searing
Instructions
- Cleanse the Methi: Submerge the fresh methi leaves in a bowl of salted water. Let them soak for 10 minutes to draw out any impurities and reduce excess bitterness.
- Prep the Greens: Drain the leaves, rinse thoroughly under fresh running water, and pat dry. Finely chop the leaves and set aside.
- Combine Dry Ingredients: In a large mixing bowl, combine the chopped methi with salt, ajwain, red chilli powder, turmeric, kasuri methi, besan, atta, and 2 tbsp of oil. Use your fingertips to rub the oil and spices into the flour until crumbly.
- Add Aromatics: Incorporate the ginger-garlic-chilli paste and curd. Mix well to ensure the flavours are evenly distributed.
- Knead the Dough: Gradually add water and knead until you achieve a smooth, semi-firm dough.
- Rest the Dough: Cover the bowl with a damp cloth or lid and let the dough rest for 15 minutes to develop the gluten.
- Portioning: After resting, give the dough a quick second knead. Divide it into 6 equal-sized balls.
- Shape: Dust a rolling surface with a little atta. Roll each ball into a thin, even circle (approx. 6–7 inches).
- Initial Sear: Place the paratha on a preheated tawa (griddle) over a high flame. Flip once you see tiny bubbles appearing.
- Toast to Golden: Brush both sides generously with oil. Cook until golden-brown spots appear on both sides.
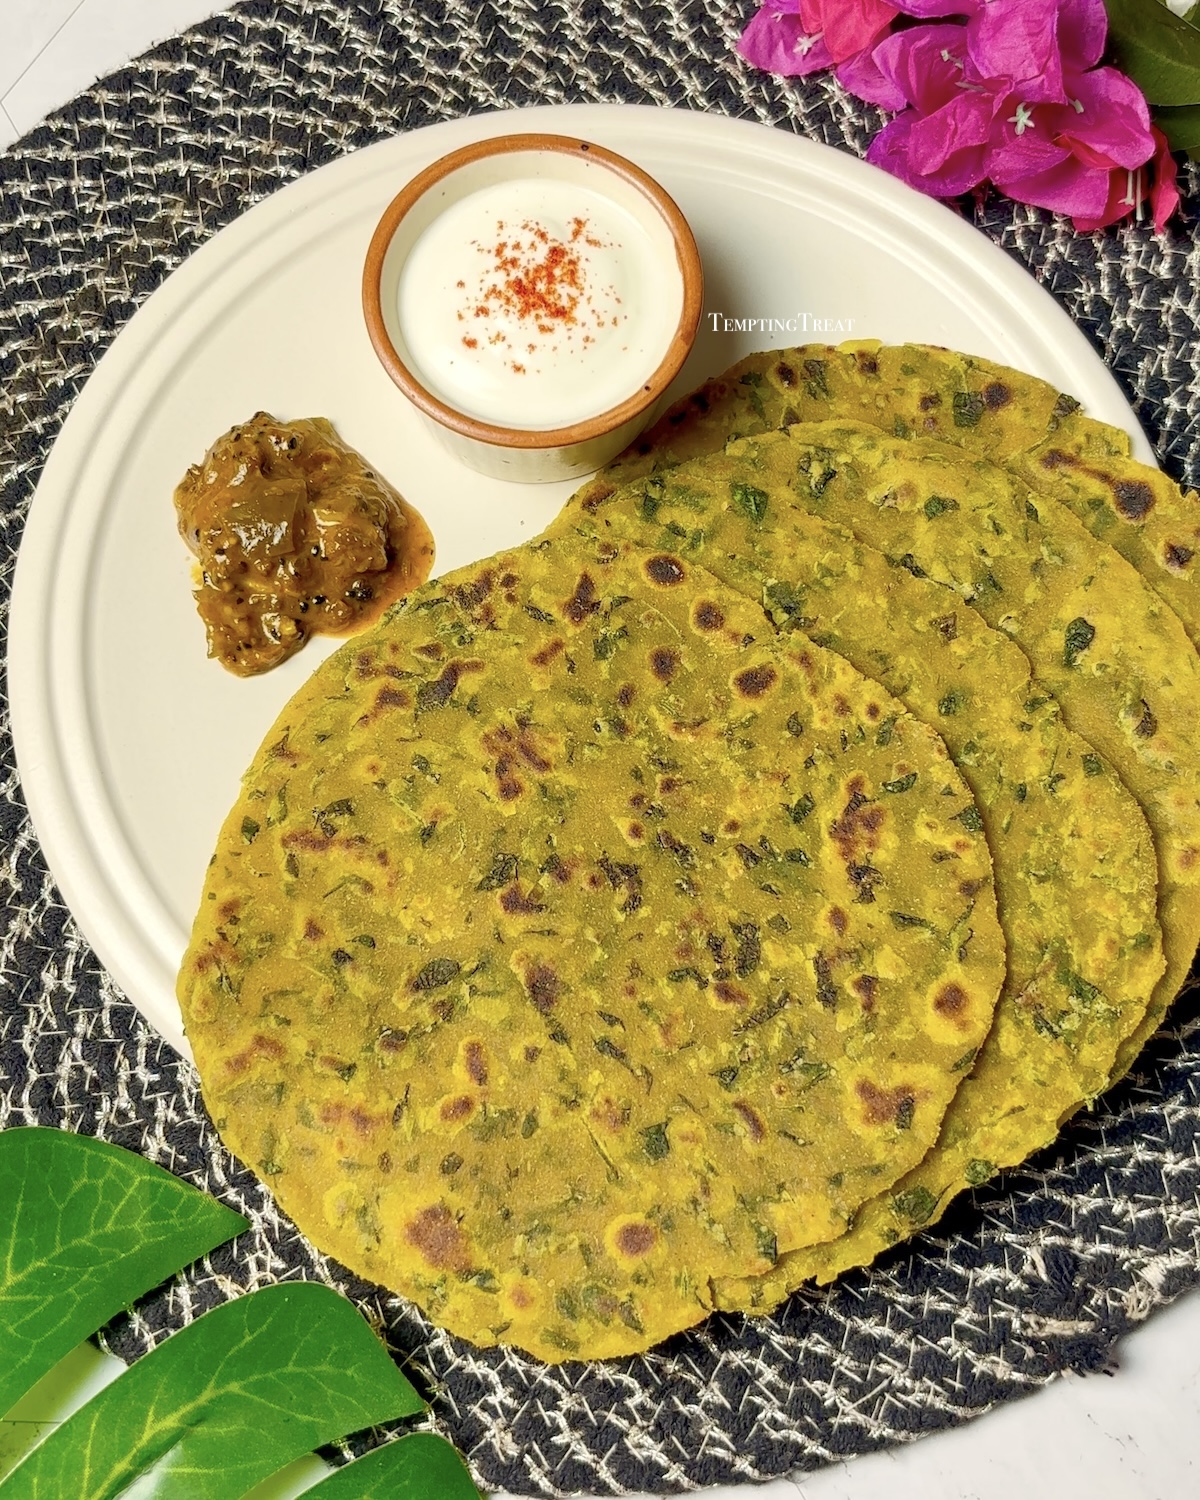
- Serve: Enjoy these hot off the tawa with a side of tangy achaar (pickle) and cool dahi (yoghurt).
Pro-Tip: Adding the curd not only provides a slight tang but keeps the parathas soft even if you eat them hours later!
Love it? Print it or Pin it! 📌
Secret to Soft Methi Parathas
Ingredients
Method
- Soak methi in salted water for 10 mins. Drain, rinse, and finely chop.
- Combine chopped methi with salt, ajwain, red chilli, turmeric, kasuri methi, besan, atta, and 2 tbsp oil.
- Mix in the ginger-garlic-chili paste and curd.
- Gradually add water to form a semi-firm dough.
- Cover and let the dough rest for 15 mins.
- Knead again briefly and divide into 6 equal balls.
- Roll out into thin circles using dry atta for dusting.
- Place on a hot tawa over high flame. Flip when bubbles appear.
- Apply oil to both sides and cook until golden-brown.
- Serve hot with achaar and dahi.
I can’t wait to see your creations! If you whip up this recipe, snap a photo and tag me @temptingtreat or use #temptingtreat on Instagram so I can feature you.
Have questions or feedback? Drop a comment below—I love hearing from you!
Happy Cooking! ✨

You May Also Like

Steamed Teriyaki Chicken Buns/Bao (Baozi)

How To Make Dhaba Style Aloo Paratha